A parody, that features a main character, with a bun for a head and a blindfold featuring MDX across it. A blue box with TS on it, a black box with some rain drops, and a green moose appear to be background characters. A character with a W for a head, representing a standard CMS, is eating popcorn in the corner.
Your scientists were so preoccupied with whether they could, they didn't stop to think if they should - Ian Malcom
This wasn't the post I planned to write. Initially, I thought this post was going to be dedicated exclusively to my bespoke content management system. Where, I thought I’d wax poetic for a while about how sometimes the best solutions, are tailor made. However, I’ve since come back to my senses to realize that the best solution is the one with the smallest number of compromises, hand crafted be damned.
So, that’s where contentlayer21 (maintained fork of contentlayer) came in to the equation. it's a library I stumbled upon that did exactly what I’d come up with, but in a better, more robust, and much more practical manner. In short, it's beautiful.
In honesty, I was awestruck by contentlayer’s pitch video2. Especially so, because I’d just gone through the whole process of pouring blood, sweat, and tears into my own content management system for this site. It really wasn't long after that, that I swapped my whole custom solution out for it.
But, swallowed pride aside, creating my own content backend was quite a learning experience for me, so I wanted to talk about it. As such, I present to you my technical summary on my custom solution.
I started my life in web working with traditional CMSes like WordPress3 and then briefly, Ghost4. Later, I took the JAMstack5 hype train as far as it could go, fetching data from headless CMSes6 like Strapi7 and Contentful8, and integrating it into Gatsby9 frontends. Then, sometime before building this site, I caught myself up on the latest headless CMSes people have been working with. I experimented with Payload CMS10 and Directus11, before diving into off-the-shelf backends like Supabase12, and PocketBase13 (my personal favorite).
However, something about all the options I weighed kept disappointing me in one way or another. So, after a day of feeling the frustration of yet another imperfect solution, I found myself one late evening going "Yeah, well, I'll build my own CMS, with Blackjack, and Hookers! In fact, forget the CMS"14. So, that's what I did.
My idea was pretty straightforward. Instead of a traditional user-friendly CMS, I based it on Astro's15 model of content management (Content Collections16) —leveraging markdown17, yaml18, and jsx19 in .mdx20 files to store and organize content—with my own twist, a database I can cache all that data i want into. The latter meant I could fetch and generate content live in production, in taking advantage of Next.js’ SSR features21.
As such, the following was the strategy I'd come up with as I poured over documentation22 and the various Next.js markdown blog examples23, 24 Vercel25 has available:
Scan the posts.
Process the data.
Store data into a SQLite database
Fetch data from the database.
Render the data.
Sounds easy enough, right? Well, sorta. The largest hurdle to overcome was in the processing phase, when I decided simply fetching the featured Image src26 wasn’t good enough. That's because I wanted srcset27 blurs and that’s when things got complicated. A smaller hurdle, was realizing I wasn’t fetching the image transformations properly. Investigating why is how I wound up learning about Next’s loaderFile28 configuration option, but I digress as that’s somewhat specific to the fact I use a CDN29 (i.e., AWS CloudFront30) to distribute this site (& it’s assets).
Now, while my custom solution worked, it was, admittedly, flawed. First, because I really only implemented the first three letters of the CRUD31 acronym for this. Second, by the time I came up with a way to auto delete content I’d removed, well, that's when I stumbled upon a rad little library called contentlayer2, as I'd mentioned before. That was the turning point which pretty much signaled the end of any further development on my custom solution.
Before that happened, I should mention why I wound up using Turso32, a SQLite33 (libSQL34) DBaaS35 for this project, since SQLite's whole purpose is that it's embeddable.
Now, I actually did try that; embedding the SQLite database right into my Next.js application, and leveraging Bun’s native SQLite driver36 in the process. However, when I was testing development builds of this site on Vercel, I learned there were some limitations37, 38, 39.
The first issue was that, ephemeral storage in static functions makes SQLite impractical37. Second, while a read-only implementation is possible38, you are limited by the serverless function's storage capacity39. Finally, I couldn't get read-only SQLite to work on dynamically rendered routes. In my testing, reading from the embedded SQLite database was only possible on routes generated using generateStaticParams40.
So, in thinking about the future, and not wanting to limit my project pre-emptively, a DBaaS seemed my only viable option. However, by the time I'd actually realized that, I'd already written my Drizzle ORM41 statements for SQLite, and I wasn't in the mood for converting them into a different SQL format. So, of Drizzle's SQLite compatible drivers42, I wound up using Turso.
Choosing Turso over Cloudflare's D1
I suppose I could’ve used Cloudflare’s D143, instead of Turso, but the moose mascot was so gosh darn cute! Couple that with the fact they have a wonderfully generous free tier44, how could I say no?!
Of the ORMs, I had narrowed it down to two options, Prisma45 or Drizzle ORM41. I settled on Drizzle because I liked the focus on TypeScript, and I liked that you could write raw(ish) SQL as an escape hatch using its magic SQL46 operator. I also really liked the idea that the knowledge gained in working with it, would be transferable, since one of their taglines is if you know SQL, you know Drizzle. I'm also just a sucker for companies that know how to execute self-deprecating advertising strategies47, 48, so my heart was settled on using it.
Anyways, since I did end up using Drizzle, there was some configuration required before I could flesh out the rest of my solution. Aside from registering for Turso and generating my API keys, the first thing I had to do was setup a drizzle.config.ts49 file to use with Turso.
I loosely followed Turso's guide on setting it up with Drizzle50, then came up with the resultant code above. In sum:
I'm importing multiple schemas using the wildcard glob51 pattern (*).
SQL migrations get written into the root drizzle/ directory.
I'm using the SQLite flavor of Drizzle, in tandem with the Turso driver.
I load in my credentials for Turso using the { dbCredentials } object.
There's a type check which ensures that config object is in agreement with the Config type imported from drizzle-kit.
Something I should note, is that instead of injecting the Turso credentials from a .env file using something like process.env.TURSO_AUTH52, I took advantage of SST's53secret54 component instead. You'll notice I tapped into the { Resource }55 object from sst using some simple dot notation56. This really just avoids the hassle of passing around a .env.local57 file between work machines / dev environments.
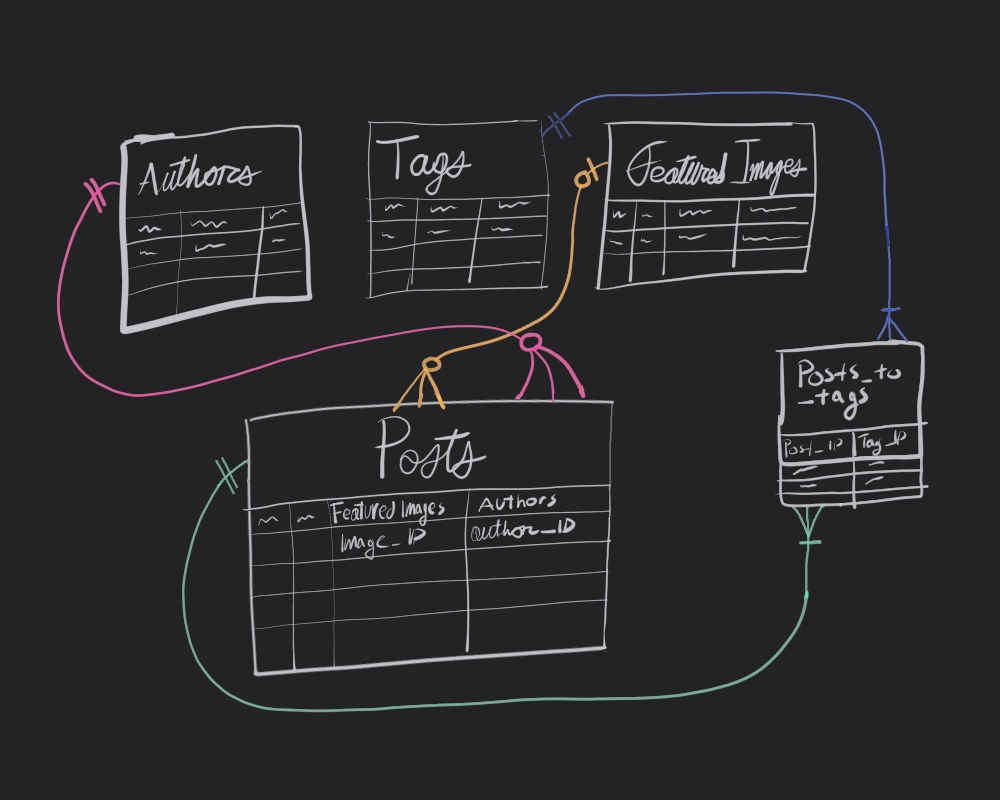
Once I had that, then I just had to define some schemas/tables58 for my posts. This resulted in creating the following tables:
authors
tagSlugs
featured_images
posts
The idea was that the authors, featured_images, and tagSlugs tables would respectively create one-many59, and many-many59 relations to the posts table. Something like this:
Entity Relationship diagram showing 1:M (authors, featured_images), and M:M (tagSlugs). The latter made possible with a junction table (posts_to_tagSlugs)
In keeping with SQLites Datatypes60 and what's available in Drizzle61 Some commonalities between these tables (as we'll see), is that I'm using a string for each rows id and primary key column, and a integer set to timestamp for the date column. That's because the id is a UUIDv462 generated using Bun's crypto.randomUUID()63, and the date is a utc string. The rawStr column, is simply the raw utf8 string generated from reading the .mdx file into memory.
Of note, in the below schemas, I'm manually exporting their types. Unfortunately, at the time, I simply wasn't aware of drizzle's $inferInsert64, $inferSelect64 functions to automatically generate types. So, that's why I'm doing it artisanally, in case you were wondering.
Since the posts.ts schema/table is the most complicated, being the one that integrates all the other tables, it's important to talk about what's happening. You'll notice in the below, I'm importing the previously defined schemas authors, tagSlugs, and featured_images, and consuming them both as foreign keys and in relational tables.
In using them as foreign keys, I'm really just taking advantage of the cascade operations.
As far as relations go, I'm using drizzles relations65 feature, and creating relational tables for both one-to-many (authors, featured_images) and many-to-many (tagSlugs) relations. In truth, this was somewhat extra, since I had foreign keys available to me on turso, but I was curious to know what drizzle was capable of, and this is one such addition that drizzle brings to the table (no pun intended >.<), beyond (most) vanilla SQL functions.
With all the schemas fleshed out the last thing to setup, was a connection to the remote DB on Turso66, where I then imported the schemas directly into the client connection.
With that squared away, the final step was to push our schemas as tables to our database on turso, with a single command: drizzle-kit push67. Though, since I was importing credentials via SST, that command was more like: sst shell bun run drizzle-kit push68, but I digress.
With the the database configured, the rest of the CMS could then be fleshed out. This process was in theory quite simple, following the outline from earlier. All I had to do was read content into memory, process them, and send it into the database via insert statements.
In practice, this took the form of an extensive script I wrote that took advantage of Bun’s speedy File I/O APIs69, to scan a folder that held all the blog content, which then read any Markdown and MDX files into memory as UTF-8 strings, sans any ignored ones.
From there I used gray-matter70 to parse the stringified front matter, to then create an object to store both the front matter data and the raw string itself.
Then I checked that data for a UUID before generating a fresh UUIDv4 using Bun.crypto which gets injected into the original file’s front matter, where it can then be read back into memory to update the data object.
I also performed a similar step for the post slug as well, where I checked the front matter for the existence of a slug before generating one from the file name. I also checked if the slug and file name match, and if not, the file name overrides the slug. This is injected into the original file as well, and like the above, read back into memory to update the working data object.
Then I had a whole Image processing step, which, admittedly, is a little more complicated than the other two steps (as we’ll see). In short, a function scans the front matter data for an imageSrc, then it copies the (relatively defined) image from the content/assets folder, into Next’s /public folder14. Then it runs the image through plaiceholder71 to generate a blurry placeholder image (in base6472 format) and to also fetch the image dimensions (height, width). Finally, it appends all that data to the object I’d generated earlier.
Once all the data was loaded, I simply fetched it using drizzle’s query builder (mostly, some calls were proper select statements), and I took advantage of using the React cache73 hook built into Next.js to memoize those DB calls.
Prepping for ISR
There wasn’t a real point to doing so, seeing as I never implemented ISR, so the post page data never really went stale. Still, I figured in the event I did implement it, it’d come in handy. Well, at least I know how it works now.
Once I had the data, the only thing left to do was to use mdx-bundler74 to process the raw MDX string, and I just loaded everything else into my front end.
Alright, the very first thing to do, was to ingest the files that actually had the content, and bring everything into memory. The below script puts into action exactly that. It’s a little complicated, but most of the complexity stems from the added processing steps. We'll go through this, chunk by chunk, over the following sections, this is just to show you the final product, upfront.
One thing to note, is that this is the raw script I was previously using, complete with eslint ignore directives, suggestions, and the comments I left for myself, to help explain to myself what’s going on.
Now, I did think about cleaning the script up, but I felt it was better to show you exactly what I was using right up until the switch to contentlayer2. Why? Perhaps for posterity, or perhaps I just find the code I wrote a while ago interesting due to its now foreign nature to myself.
[INFO]: fetch-mdx.ts
// fetch-mdx.ts#! /usr/bin/env bun/* eslint-disable no-undef -- bun runtime will provide bun functions *//* eslint-disable no-console -- doesn't run in the browser, so this is fine */import path from'node:path';import { readdir, access } from'node:fs/promises';import matter from'gray-matter';import { getPlaiceholder } from'plaiceholder';const isNonEmptyArrayOfStrings = (value: unknown): value is string[] => {returnArray.isArray(value) && value.length > 0 && value.every((item) => typeof item === 'string');};interfaceConfigProps {// must be relative path from root project directory => './content'contentFolder: string;// array of relative paths INSIDE the content folder ['./assets']foldersToExclude?: string[];// array of literal file name/ext => ['README.md']filesToExclude?: string[];// debugdebug?: boolean;suppressErr?: boolean;}exportconstdefaultConfig: ConfigProps = {contentFolder: './content',foldersToExclude: ['./assets'],filesToExclude: ['LICENSE', 'README.md'],};/* * @example batchFetchMDXPaths({config}) * () => ['./content/blog/post0.mdx', ..., './content/blog/postN.md'] */exportconst batchFetchMDXPaths = async ({ contentFolder, foldersToExclude, filesToExclude, debug, suppressErr,}: ConfigProps): Promise<string[] | undefined> => {try {const dir = awaitreaddir(contentFolder, { recursive: true });const excludedFolders = foldersToExclude?.map((folder) => {const cleanedFolderPath = folder.replace('./', '');return cleanedFolderPath; });//const absPath = path.resolve(path.join(process.cwd(), contentFolder))const fileArr = dir.map((item): string | undefined => { debug && console.log('logging raw path:', item);if (excludedFolders?.some((folder) => item.startsWith(folder))) { debug && console.log('skipping ', item);return; }if (filesToExclude?.some((file) => item.endsWith(file))) { debug && console.log('ommitting ', item);return; }if (item.endsWith('.mdx') || item.endsWith('md')) {return `${contentFolder}/${item}`; }returnundefined; });const filter1 = fileArr.filter((el) => el);// validate found pathsconst cwd = process.cwd();const validatedArr = awaitPromise.all( filter1.map(async (pathStr) => {try {awaitaccess(path.resolve(path.join(cwd, pathStr!)));return pathStr; } catch (err) {console.error(err); } }), );const finalArr = validatedArr.filter((el) => el); debug && console.log(finalArr);if (isNonEmptyArrayOfStrings(finalArr)) return finalArr; } catch (err) {if (err instanceofError && 'code'in err && err.code === 'ENOENT') { !suppressErr &&console.error("Ooops! Couldn't open that directory! Are you sure that folder is relative to root your project directory, i.e. './src/content/posts'? ", err, );return; } !suppressErr && console.error(err); }};interfaceImageUtilProps {fmatter: Record<string, unknown>;mdxPath: string;publicPath?: string;imageKey: string;debug?: boolean;}const newimageEmbedPath = async ({ fmatter, mdxPath, publicPath, imageKey, debug,}: ImageUtilProps): Promise<string | undefined> => {if (imageKey && typeof imageKey === 'string' && imageKey in fmatter) { debug && console.log('found hero image with key', imageKey);//const imageType = 'type' in fmatter && (fmatter.type as string);const currentImagePath = fmatter[imageKey];if (typeof currentImagePath !== 'string') return;//debug && console.log(currentImagePath)const splitStr = mdxPath.split('/');// need to get parent path before mutating array with pop.const parentPath = splitStr.slice(0, splitStr.length - 1).join('/');//debug && console.log(parentPath)// now we can get the mdx file name to use as the folder later.const mdxFile = splitStr.pop();if (!mdxFile) return;//const mdxFileSlug = mdxFile.split('.')[0];//debug && console.log(mdxFileSlug)const imgToCopyFilePath = path.resolve(parentPath, currentImagePath);//debug && console.log(imgToCopyFilePath)const publicCopyPath = `/public/${publicPath}/${currentImagePath.split('/').pop()}`;//debug && console.log(publicCopyPath)const embedPublicCopyPath = `/${publicPath}/${currentImagePath.split('/').pop()}`;//debug && console.log(embedPublicCopyPath)const pathToCheck = path.join(process.cwd(), publicCopyPath);//debug && console.log(pathToCheck)const constPublicImgFile = Bun.file(pathToCheck);const imgFile = Bun.file(imgToCopyFilePath);/* * If the file isn't in the public folder, then copy it. * If an image already exists in the public folder, * but the declared frontmatter image is * different (diff in size), then replace it. */const checkImg = await constPublicImgFile.exists();if (!checkImg) { debug && console.log('image not in public folder, copying ...');awaitBun.write(`${process.cwd()}${publicCopyPath}`, imgFile); } elseif (constPublicImgFile.size !== imgFile.size) { debug && console.log('found image is different from public folder, copying ...');awaitBun.write(`${process.cwd()}${publicCopyPath}`, imgFile); } else { debug && console.log('image is the same, not copying'); }return embedPublicCopyPath; }};constimgMetaPlusBlurryPlaiceHolders = async ({ fmatter, mdxPath, imageKey, debug }: ImageUtilProps) => {if (imageKey && imageKey in fmatter) { debug && console.log(`using ${fmatter[imageKey] asstring} to generate img data + blurs`);const currentImagePath = fmatter[imageKey];//console.log(currentImagePath)const splitStr = mdxPath.split('/');const parentPath = splitStr.slice(0, splitStr.length - 1).join('/');const imgToCopyFilePath = path.resolve(parentPath, currentImagePath asstring);const imgFile = Bun.file(imgToCopyFilePath);const arrayBuf = await imgFile.arrayBuffer();const buf = Buffer.from(arrayBuf);const { base64,metadata: { height, width }, } = awaitgetPlaiceholder(buf);return { base64, height, width }; }};constcomboImageProcessing = async ({ fmatter, mdxPath, imageKey, publicPath, debug }: ImageUtilProps) => {if (imageKey && imageKey in fmatter) {// need to do this first (the other function seems to mutate something)const imgBlurPlusMetaRes = awaitimgMetaPlusBlurryPlaiceHolders({ fmatter, mdxPath, imageKey, debug });const imgBlurData = imgBlurPlusMetaRes?.base64;const imgHeight = imgBlurPlusMetaRes?.height;const imgWidth = imgBlurPlusMetaRes?.width;const newImgPath = awaitnewimageEmbedPath({ fmatter, mdxPath, imageKey, publicPath, debug }); fmatter[imageKey] = newImgPath;return { ...fmatter, blur: imgBlurData, height: imgHeight, width: imgWidth }; }};interfaceInjectionPointProps {fileArr: string[];strOfInterest: string;precisionPoint: number;debug?: boolean;}constgetInjectionPoint = ({ fileArr, strOfInterest, precisionPoint, debug }: InjectionPointProps) => {const getPoint = fileArr.map((strLine, index): number | undefined => {// we're going to look for the first "---" of the front matter// then inject. We can test that we're not adding at the end by// checking if the key following injection is validconst keyGuess = fileArr[index + precisionPoint]?.split(':')[0];//console.log(keyGuess)//console.log(strLine.split(':')[0])const point = index + precisionPoint;if (strLine === strOfInterest && keyGuess) { debug && console.log('inject at ', index + precisionPoint, 'before ', keyGuess);return point; } elseif (strLine.split(':')[0] === strOfInterest) { debug && console.log('found', strOfInterest, 'at', index, 'Injecting at', point, 'before', keyGuess);return point; }returnundefined; });const injectionPoint = getPoint.filter((el) => el)[0];return injectionPoint;};interfaceInjectionProps {rawFile: string;absFilePath: string;debug?: boolean;}constinjectUUID = async ({ rawFile, absFilePath, debug }: InjectionProps) => {const uuid = crypto.randomUUID();const fileArr = rawFile.split('\n');// we need to search the file string to find out where// we can safely inject the uuid.const injectionPoint = getInjectionPoint({ fileArr, strOfInterest: '---', precisionPoint: 1, debug });if (typeof injectionPoint !== 'number') return; fileArr.splice(injectionPoint, 0, `id: ${uuid}`);const finalString = fileArr.join('\n');const fileWritePath = absFilePath; debug && console.log(`saving updated markdown file to `, fileWritePath);awaitBun.write(fileWritePath, finalString);const newMatter = matter(finalString).data;// we'll need to update the image path in memory, if it existsreturn newMatter;};constinjectSlug = async ({ rawFile, absFilePath, debug }: InjectionProps) => {const fileArr = rawFile.split('\n');const fileWritePath = absFilePath;console.log(fileWritePath);const fileName = fileWritePath.split('/').pop();console.log(fileName);if (!fileName) return;const slug = fileName.split('.')[0];// assuming we have the id, we'll inject it right afterconst injectionPoint = getInjectionPoint({ fileArr, strOfInterest: 'id', precisionPoint: 1, debug });if (typeof injectionPoint !== 'number') return; fileArr.splice(injectionPoint, 0, `slug: ${slug}`);const finalString = fileArr.join('\n'); debug && console.log(`saving updated markdown file to `, fileWritePath);awaitBun.write(fileWritePath, finalString);const newMatter = matter(finalString).data;// we'll need to update the image path in memory, if it existsreturn newMatter;};constcomboInject = async ({ rawFile, absFilePath, debug }: InjectionProps) => {
Alright, there’s a lot going on here. Let's start with the main function, and work our way through it, shall we?
Looking at batchFetchMain(), you’ll see it takes a configuration object of type BatchFetchMain, which extends types ConfigProps and BatchFetchFrontMatterProps. This object defines where the content is and what to exclude. It resembles something like this:
// ConfigProps + BatchFetchFrontMatterProps = BatchFetchMaininterfaceBatchFetchMain {// must be relative path from root project directory => './content'contentFolder: string;// array of relative paths INSIDE the content folder ['./assets']foldersToExclude?: string[];// array of literal file name/ext => ['README.md']filesToExclude?: string[];// debugdebug?: boolean;suppressErr?: boolean;pathsArr?: string[];imageKey?: string;publicPath?: string; // i.e. 'assets/images/blog/heros'priorityConfig?: Record<string, number>;}
From there, it generates an array of valid .mdx paths using batchFetchMDXPaths, as defined by the configuration object.
Going through it, it recursively reads the contents of the given contentFolder using readdir and saves the result into an array of fs.Dirent objects I lovingly called dir:
Then it validates the paths, by mapping through the filter1 array, checking if the path is accessible using access, and returning the path if it is, and an error if it isn't.
If at any point during this whole process a catastrophic failure occurred, it would catch the error like so:
...try { ... }catch (err) {if (err instanceofError && 'code'in err && err.code === 'ENOENT') { !suppressErr &&console.error("Ooops! Couldn't open that directory! Are you sure that folder is relative to root your project directory, i.e. './src/content/posts'? ", err, );return; } !suppressErr && console.error(err); }...
Once the finalArr is generated from batchFetchMDXPaths, the posts can then be read into memory, and move on to processing via batchFetchFrontMatter().
With all the data in memory, it became possible to actually do something with it. That's where the pre-processing step (of the posts) came into play. Just like before, we'll start with the main function (batchFetchFrontMatter()) and work our way through it.
This function is responsible for performing all the processing of the post data, and returns a resultant array of assembled post objects. They get consumed in the push-mdx.ts script (which we'll see later), that does the actual database insertions.
Alright, with this deceptively simple overview, it's time to work through it. So, the first thing to do is to map through the validated pathsArr, and get the absolute path to the current given path, using path.resolve with the cwd joined to the given mdxPath using path.join:
In brief, the posts get assigned a UUID and a slug as needed. Then, if they have a featured image, they get copied over to the public folder and a blurry srcset image gets generated and stored as a base64 string into the in-memory data object, along with the image dimensions. Finally, all that data generated during this step, gets returned as an array of objects.
Then we're assigning a priority to the current object's type (correlates to the respective schemas/tables we defined earlier), if it exists in the frontMatter and the configuration:
Then we go through the rest of the function. Essentially, we're walking through several different cases, and injecting/retrieving/copying data in a recursive fashion.
Performance vs Readability
A switch statement could've worked here, but I decided against it for some reason. I think it's because I prioritized readability over the marginal performance gain of a switch.
case_0: If there's no id or slug in the frontmatter, it injects them using comboInject() and as long as the result isn't undefined, it recursively calls the matterProcessor() function, using the commonConfig object and the freshly created front matter, aptly labled newMatter. Once that's done, it uses Bun.file to read the updated .mdx file, and assigns it to the returned rawStr key.
comboInject is the function that handles this case, it looks like this:
constcomboInject = async ({ rawFile, absFilePath, debug }: InjectionProps) => {const uuid = crypto.randomUUID();const fileArr = rawFile.split('\n');const fileWritePath = absFilePath;//console.log(fileWritePath);const fileName = fileWritePath.split('/').pop();//console.log(fileName);if (!fileName) return;const slug = fileName.split('.')[0];// we need to search the file string to find out where// we can safely inject the uuid.const injectionPointId = getInjectionPoint({ fileArr, strOfInterest: '---', precisionPoint: 1, debug });if (typeof injectionPointId !== ) ;
You'll notice it generates the uuid (v4) with Bun's crypto.randomUUID(), then it generates the slug by splitting and popping the absolute file path (absFilePath). This essentially means the file name, is the ultimate source of truth for the slug, and if the filename changes, the slug changes with it.
Then it uses getInjectionPoint() to find out where to inject the uuid and slug. That function looks like this:
interfaceInjectionPointProps {fileArr: string[];strOfInterest: string;precisionPoint: number;debug?: boolean;}constgetInjectionPoint = ({ fileArr, strOfInterest, precisionPoint, debug }: InjectionPointProps) => {const getPoint = fileArr.map((strLine, index): number | undefined => {// we're going to look for the first "---" of the front matter// then inject. We can test that we're not adding at the end by// checking if the key following injection is validconst keyGuess = fileArr[index + precisionPoint]?.split(':')[0];//console.log(keyGuess)//console.log(strLine.split(':')[0])const point = index + precisionPoint;if (strLine === strOfInterest && keyGuess) { debug && .(, index + precisionPoint, , keyGuess);
Once it's injected into the raw file string array (fileArr), it can be condensed back into a string, saved into the .mdx file using Bun.file, and the fresh front matter data newMatter can be returned.
The other two cases, case_1: no slug in frontMatter and case_2: no id in frontMatter, repeat the respective comboInject processes, but for their respective needs.
Then, like it's name, injectUUID(), takes the inputs from with the given props above, finds the place in the MDX string to inject it, and updates the file with the injected UUID.
constinjectUUID = async ({ rawFile, absFilePath, debug }: InjectionProps) => {const uuid = crypto.randomUUID();const fileArr = rawFile.split('\n');// we need to search the file string to find out where// we can safely inject the uuid.const injectionPoint = getInjectionPoint({ fileArr, strOfInterest: '---', precisionPoint: 1, debug });if (typeof injectionPoint !== 'number') return; fileArr.splice(injectionPoint, 0, `id: ${uuid}`);const finalString = fileArr.join('\n');const fileWritePath = absFilePath; debug && console.log(`saving updated markdown file to `, fileWritePath);
As for handling just the slug, this does something similar, except it doesn't generate a UUID to inject, it simply takes the file pathname, and creates a slug from that.
This step is somewhat intensive. In this step I'm generating the blurry srcset image using plaiceholder and grabbing the resultant image dimensions, as well as copying over the featured image into the public folder.
The latter strategy ensures that featured images can be served directly from Next.js itself. As well. it also keeps things consistent by replicating the functionality of a rehype plugin I currently use (rehype-mdx-import-media by Remco Haszing), which does the same thing, but for images contained in the content body of the mdx file, rather than the front matter.
Aside, we'll begin our look at this process by understanding the main function here, comboImageProcessing().
Then we have the actual function comboImageProcessing(), that leverage inner functions to both generate the srcset and dimension data, and performs the copying step to the public folder.
constcomboImageProcessing = async ({ fmatter, mdxPath, imageKey, publicPath, debug }: ImageUtilProps) => {if (imageKey && imageKey in fmatter) {// need to do this first (the other function seems to mutate something)const imgBlurPlusMetaRes = awaitimgMetaPlusBlurryPlaiceHolders({ fmatter, mdxPath, imageKey, debug });const imgBlurData = imgBlurPlusMetaRes?.base64;const imgHeight = imgBlurPlusMetaRes?.height;const imgWidth = imgBlurPlusMetaRes?.width;const newImgPath = awaitnewimageEmbedPath({ fmatter, mdxPath, imageKey, publicPath, debug }); fmatter[imageKey] = newImgPath;return { ...fmatter, blur: imgBlurData, height: imgHeight, width: imgWidth }; }};
We can see how the blurry srcset and the image dimensions are obtained below.
This function finds the absolute image path from the relative path given in the front matter, and then reads it into memory as an arrayBuffer, leveraging Bun's File I/O API. Then it transforms it from an arrayBuffer to simply a Buffer, which can be used as an input for getPlaiceHolder(). The latter is a function from plaiceholder, and it relies on sharp under the hood. It's also the actual function that generates the blurry srcset and provides the image dimensions.
With that out of the way, the final step is to copy the image from the content folder, to the public folder, which Next.js can use to serve the image. The below function both performs that step, as well as generates the new relative path (to the public folder), which will be saved into the in-memory post object.
const newimageEmbedPath = async ({ fmatter, mdxPath, publicPath, imageKey, debug,}: ImageUtilProps): Promise<string | undefined> => {if (imageKey && typeof imageKey === 'string' && imageKey in fmatter) { debug && console.log('found hero image with key', imageKey);//const imageType = 'type' in fmatter && (fmatter.type as string);const currentImagePath = fmatter[imageKey];if (typeof currentImagePath !== 'string') return;//debug && console.log(currentImagePath)const splitStr = mdxPath.split('/');// need to get parent path before mutating array with pop.const parentPath = splitStr.(, splitStr. - ).();
From there, we can zoom further back out to the parent function to notice we return the assembled processed object as the res, to generate the metaArr array, which is then sorted and returned according to the priority we defined earlier:
To notice we then return the frontMatterArr generated from the batchFetchFrontMatter(). With that, our walk through of the first part of the CMS (Scanning and Processing) is complete!
Okay, so I've talked a lot about generating data, but where does it all go? Well, the remote database on Turso, of course! You can check out the below scripts to witness it in action! The first is a collection of insertion functions (bun-db-funcs.ts), the second is a helper function that imports the previous functions dynamically from the configuration object (push-mdx.ts), the final script integrates all of this into db-gen.ts, which is called by the runner.ts script which is called during prebuild (runs before next build).
The below isn't that complicated (thankfully). You'll notice that I'm primarily integrating all the schemas/tables defined all the way at the beginning of this article, and leveraging drizzle's statement builder to insert the data we generated into the database.
[INFO]: bun-db-funcs.ts
// bun-db-funcs.ts/* eslint-disable no-console -- we're not in the browser, so this is fine. */import { eq, and } from'drizzle-orm';//import { maindb } from '@/lib/db/bun-db';import { maindb } from'@/lib/db/turso-db';import { typeAuthors, authors } from'@/lib/db/schema/authors';import { typeTags, tagSlugs } from'@/lib/db/schema/tagSlugs';import { typePosts, posts, postsToTags } from'@/lib/db/schema/posts';import { typeFeaturedImages, featuredImages } from'@/lib/db/schema/featured-images';exportconst insertAuthors = async (data: Authors): Promise<void> => {if (!data.id) {
One thing you'll probably notice, is that I'm assembling a temporary object within each insertion function (respective of the given table, e.g., authors), from what already exists in the database. By running this comparison, I'm ensuring that only new content is inserted into the database, or content that needs to be updated. As such, this drastically reduces the number of rows that need to be written.
Turso limits
Turso only gives 25 million row additions per month for free, so I decided it was important to keep as much of that 25 million as possible. You know, just in case.
Another thing you might notice is that I've commented out the maindb that's imported from @/lib/db/bun-db. That database, is the local one that relied on Bun's native SQLite driver. But, for the reasons I went over earlier, I wound up using Turso instead.
Finally, I wanted to point out the sleep() functions. Those were put in place, because I was having issues performing the does exist tests, as part of my attempt to reduce the numbers of row additions. My best guess, is that latency between the database, and my little program, was introducing false negatives.
For example, when I asked that database if there was content for the other tables that posts needed, it would say no, despite having just inserted that data. This would stop any posts from being inserted into posts. The sleep(), was a band-aid solution that gave the database enough time to reflect the newly inserted data, and successfully allowed for the rest of the script to execute, so posts could make their way to the posts table.
With that, you can then see how these functions might be integrated in the below push-mdx.ts script.
The below is more or less a helper function, that integrates closely with a configuration object (which defines the functions to be imported, such as from the script above). This was essentially my attempt at creating a generic function, which others could use if they created their own functions to be imported and used.
// push-mdx.ts#! /usr/bin/env bun/* eslint-disable no-console -- bun is bun */import { typeBatchFetchMain, batchFetchMain } from'./fetch-mdx';interfaceDbFunctionsProps {dbFunctionModules: {insert: Record<string, unknown>; };}exportconst batchPushMain = async (fetchConfig: BatchFetchMain & DbFunctionsProps): Promise<void> => {// get processed front matter arrayconst matterRes = awaitbatchFetchMain(fetchConfig);if (!matterRes) { fetchConfig.debug && console.log('Ooops, no data found!');
What I'm most proud of here, is that I figured out how to dynamically import modules from the given string from the configuration object. It's admittedly not pretty, as I import the functions based on their given declared type, but the defined functions were successfully imported by leveraging Object.keys(), and React's dynamic import syntax. However, you'll probably notice the eslint directives to disable typechecking on those functions. That's simply because I didn't know of a easy way to type them.
While the latter problem could've been solved by simply creating/importing those function types, this script was written at a point where I thought I could release this thing to the public as ready to use software. Thus, demanding people provide types with their functions seemed like a big ask, in my opinion. Though, I suppose expecting users to create their own database functions in the first place was probably a much greater ask. By that point, why even use something like this? But, I digress.
As well, you'll notice I'm importing the main fetch function (batchFetchMain()), which again both fetches the posts to read, and performs various processing steps. If you'll recall, many of those steps are admittedly quite rigid, or inflexible, which would create further problems if I ever did wind up generalizing this code based content management system.
Inherent problems aside, you can see how my generic script was integrated with the configuration object in the next section.
This is where the two scripts above are integrated into one main function that does everything. batchPushMain() is called with the configuration object, shamelessly called laniConfig.
The point of this script, was to create a simple function that could be integrated into the runner.ts prebuild script—which I'll cover a bit later—along with setting up a integrated configuration file for my CMS.
What good would a CMS be if you couldn't access any of the data you stored on to it? Pretty awful I'm betting. So, that's why it was important to write the script below to get that data.
One thing to point out, is there's a switch over from bun to node functions, and that's because the production build of a Next.js application runs on node. While it is possible to run the Next.js development server from bun, the production run time environment is strictly node, for good reason: Next.js often relies on the latest Node.js APIs that Bun simply hasn't had time to implement, yet.
In this script, I'm primarily just using the Drizzle query builder to create functions to select data from the database, to be returned as assembled chunks (with types), for use around the website. The latter can be seen in the next section.
As well, I'm also making use of the cache function, that Next.js integrates from React. In theory, this meant that each call to the database was memoized, so I'd reduce the number of row reads to the database. In practice, all these posts were statically generated, so there was ultimately no point to doing things like this, other than for science, I suppose—which is quite important!
The last step was to ensure the dbGen() function ran before next build, which was accomplished simply by creating a script runner, and calling it in our package.json.
// runner.ts/* eslint-disable no-console -- bun is bun */import'dotenv/config';import dbGen from'./db-gen';import atomGen from'./atom-gen';const runScripts = async (): Promise<void> => {try {console.log('trying to create database');awaitdbGen();console.log('dbGen success');awaitatomGen();console.log('atomGen success'); } catch (err) {console.error(err); }}; {
In the above, you'll notice I'm calling the dbGen() function from earlier, as well as a function I didn't cover called atomGen(). The latter is a script which generates the Atom Web Feed, and it relies on a library called jstoxml. I'll likely cover how that all works in a later blog post.
Aside, in the below you can see how the runner script is called with package.json. One thing to notice is that I had to directly declare my NODE_ENV as production, otherwise I'd run into issues with Drizzle being unable to work properly. I'm unsure if it was a bug in bun or if this just how things are supposed to work.
// package.json{ ...,"name":"laniakita-web","scripts":{ ...,"prebuild":"NODE_ENV=production bun ./src/scripts/runner.ts",},}
With everything now in place, every time I ran bun run build, content would be scanned, processed, and fresh content would be inserted into the database, while old content would remain the same. I was then able to retrieve it using the functions I wrote in the previous section.
So, now that we've seen how content get's transformed into data, stored, then retrieved from a remote database on Turso, the final piece of the puzzle was to load it into the frontend. The below is the old source code for these posts, which demonstrates exactly that.
The above is sorta complicated on first look, but the important thing to notice is that I'm taking the retrieved raw mdx string, and feeding it into my mdx-bundler function. That function simultaneously configures mdx-bundler with all the plugins I use for these posts.
Et voila! A CMS I built all by myself, with data flowing from a database, directly into this Next.js application, to generate a blog on the internet.
Alright, so after pouring all this time and energy into creating the above system, what went so wrong, that I felt the need to switch to timlrx/contentlayer2? Well, nothing major per se, it was just that by the time I'd written everything out, it felt overly complex, and a little half baked. I suppose once all the pieces were in place, and the high of finishing something I'd worked months on wore off, I quickly began to realize all it's flaws.
For example, if you look over the bun-db-funcs.ts, you'll notice I put little sleep() functions in between insertion steps. That was put in place, because bun is either too fast, or again, there's too much latency for the operations to complete properly, or I've introduced a bug somehow with sloppy code (which honestly is more likely). In hindsight I could've modified those functions to be transactions, but by that point the novelty of the thing I'd just created had well worn off, and the slog of future maintenance, was beginning to creep in.
Likewise, I'd originally planned on creating a full blown CRUD application, which would've tied a admin dashboard directly into the Next.js application. That way I could edit and delete posts, simply through an admin panel, but this never fully materialized, beyond a little prototype I'd built in Svelte, before moving on to creating this site in Next.js. Why? I suppose I decided to prioritize getting content to a blog first, before creating any fancy GUIs that would've tied in an authentication framework, like Lucia, into the frontend application.
As such, once I'd come across contentlayer2, I was smitten. It was doing everything I was trying to do, but in a clean little package. There were no databases to configure. There was no worry about little pieces here and there throwing a wrench into the whole system. On the surface, it seemed like it just worked.
So, I dove in. I swallowed my pride, and I scrapped months of effort building my own CMS for something I can honestly say is better. However, because I did, maintenance on this site is now significantly less burdensome, and I'm far less worried about dependency updates breaking it.
Though, I will say that the time and energy I spent creating my own solution wasn't all for naught. In fact, I still use the image processing functions I'd created earlier, inside of my contentlayer configuration. You can see how I've done this with the below code blocks. The first is my contentlayer.config.ts and the second is my recycled image processing functions (image-process.ts).
Granted, they're a little modified—there's an additional image down scaler too—but the base of it is there. Likewise, if I hadn't sunk all this energy into my own solution in the first place, I'd never have been able to truly appreciate all the work that goes into CMSes and projects like contentlayer, nor would I be able to know their limitations so closely either.
Which, speaking of, contentlayer isn't perfect, it's far from it. Because it relies on json to store content, it creates significantly inflated application bundles. It's sort of a common complaint75. Now, is it a solution that works for something small like a blog, yes, and damn well too. But, for something more data intensive, like a news aggregator? Forget it. You'd be much better served creating either the monstrosity I did earlier, or using an off the shelf CMS, because at least those can scale.
With that said, contentlayer for a site like mine, just seems like the right tool for the job. At this scale, it's as close to perfect as I'm going to get, and I'm incredibly appreciative of all the work behind it too.
Blog Tool, Publishing Platform, and CMS [Internet]. WordPress.org. 2024 [cited 2024 Oct 6]. Available from: https://wordpress.org/↩
Ghost: The best open source blog & newsletter platform [Internet]. Ghost - The Professional Publishing Platform. [cited 2024 Oct 6]. Available from: https://ghost.org/↩
/* eslint-disable-next-line @typescript-eslint/no-unsafe-assignment -- importing types would be a lot to ask for */
const dbFuncs = awaitimport(insModPath);
/* eslint-disable-next-line @typescript-eslint/no-unsafe-call, @typescript-eslint/no-unsafe-member-access -- importing types would be a lot to ask for */
Vercel: Build and deploy the best web experiences with the Frontend Cloud [Internet]. Vercel. [cited 2024 Oct 6]. Available from: https://vercel.com/home↩
Content Delivery Network - Amazon CloudFront - AWS [Internet]. Amazon Web Services, Inc. [cited 2024 Oct 6]. Available from: https://aws.amazon.com/cloudfront/↩
Kale V, Sayin E. Impressive insults: How do consumers respond to self‐deprecating advertisements? Psychology & Marketing. 2024 Jul 20;41:2695–2710. ↩
Liu C, Gao J. What makes a self-deprecating advertisement more persuasive? The role of self-uncertainty. Asia Pacific Journal of Marketing and Logistics. 2023 Jul 11;36. ↩
Dodds KC. mdx-bundler: Compile and bundle your MDX files and their dependencies. FAST. [Internet]. 2021 [cited 2024 Sep 13]. Available from: https://github.com/kentcdodds/mdx-bundler↩
Sdorra S. Contentlayer, MDX and the vercel edge function size limit | sdorra.dev [Internet]. A site about software development by Sebastian Sdorra. 2022 [cited 2024 Sep 29]. Available from: https://sdorra.dev/posts/2022-11-24-contentlayer-mdx-edge↩